Fennel, Thyme & Celery Kraut
- Mustards, Vinegars & Ferments
- Preserves
Make the most of an abundant celery and fennel harvest and create a unique winter preserve. Fennel’s lemony aniseed flavour teams perfectly with the earthy green notes of celery and thyme. The touch of heat from red chili offsets the cool and crispy kraut texture. Paying homage to the basic sauerkraut method of lactic acid fermentation, this combination is part of the new generation of krauts. Creative veggie combo’s, herbs and spices creates new taste sensations while maintaining the acknowledged benefits of naturally fermented sauerkraut. It's the perfect winter salad accompaniment and also works well with fresh or smoked seafood, eggs, creamy or tasty cheese. Throughout Europe and Asia, there's always some kind of pickled vegetable to be found in the kitchen. Thanks to Asa Simonsson’s book, Fermentation, for the inspiration to experiment with a Fennel Kraut.
The steps are simple, slice, massage with salt, pack and weigh down in a container to ferment, then bottle for use. The Notes section below the recipe contains a more detailed explanation of each step and the most common vessels to make your kraut in. When you feel comfortable with the basic steps, mix up the ingredients or add a variety of different herbs and spices to your batches and soon you to will be transformed by the fermentation process.
- Preparation Time:
- 45 minutes + fermentation time
- Quantity:
- 1 x 650 ml jar
PREPARATION
Sterilise fermentation jar and equipment.
Sterilise sealable glass jars and lids when storing the kraut.
INGREDIENTS
- 650g
- Florence fennel
- 200g
- Celery stalks
- 100g
- Turnip or daikon radish
- 15g
- Preserving salt
- 10g
- Fennel seeds, whole
- 2 tablespoons
- Fennel herb, fresh
- 2 teaspoons
- Thyme, fresh
- 1
- Red chili, fresh
METHOD
Sauerkraut uses the dry-salting fermentation method. This is simply salting and massaging the shredded cabbage or vegetables (as in this recipe) to extract the natural juices. Remaining submerged in these juices, the vegetables are transformed by a lactic acid fermentation into a refreshing melange of tangy deliciousness. If you are unfamiliar with the sauerkraut fermentation process, I suggest you read the NOTES section before starting.
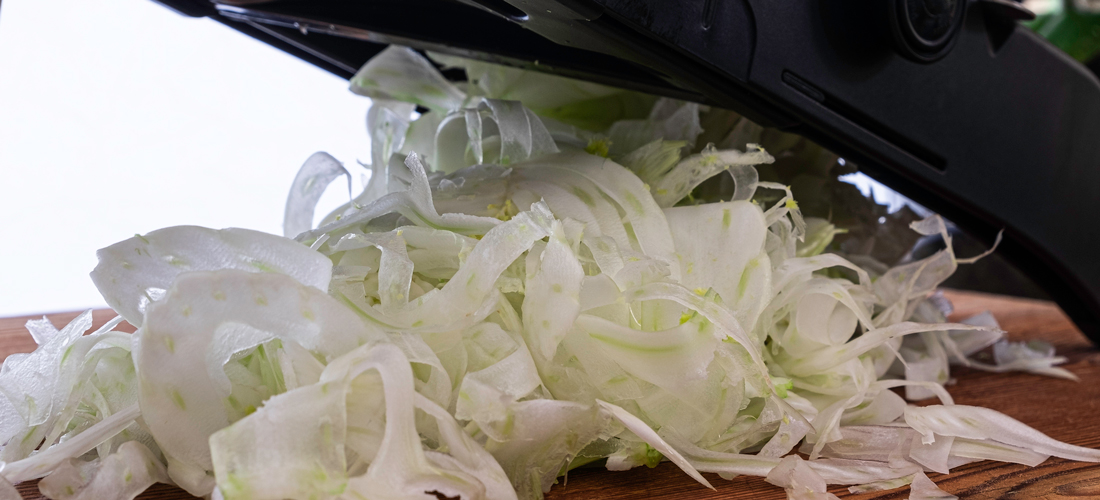
Thoroughly wash the fennel, celery and turnip, herbs and fresh chili. Remove any damaged sections or tough stalks. Cut the fennel in half and finely slice with a sharp knife, a mandolin, or a food processor with the slicing blade attachment. Slice the celery stalks to the same width as the fennel. Remove the remaining roots section from the turnip, peel and finely grate.
Finely chop the feathery foliage of the fennel. Remove the thyme leaves from the stalk and finely chop. Remove the stalk section from the chili, cut in half and finely chop. To reduce the chilli heat, remove the seeds before chopping.
Place the prepared vegetables, herbs and chilli into a large bowl. Sprinkle with salt and mix. Allow to stand for 10-15 minutes to let the natural juices start to run. This will make the massage process a little easier.
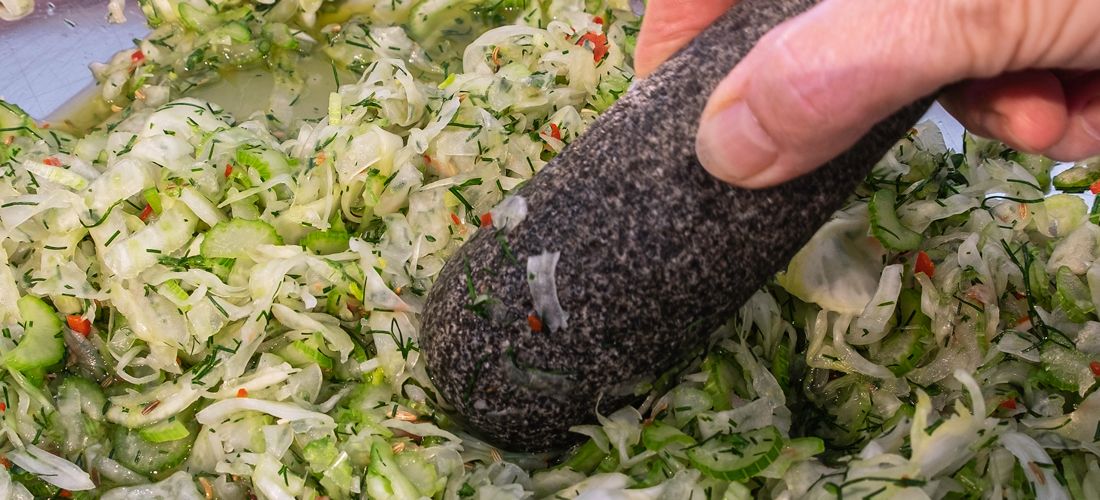
Time to get the hands in and massage the mixture until the mixture has reduced in volume and looks wilted. The texture will be softer and more malleable, and the mixture will have released more juice. If your hands tire, pound the mixture gently. I use the pestle from my mortar and pestle. A wooden mallet or meat hammer will also work.
Pack the mixture tightly into the clean dry fermentation vessel, leaving a 5 cm (2 inch) head space from the top of the jar for the gasses to escape and for the mixture to expand slightly. Push down with your fist, pestle or mallet so the liquid rises and cover the mix by approximately 2 cm (3/4 inch). This will also remove any air bubbles. Wipe the rims with a clean cloth or paper towel.
Weight down the kraut to keep under the juices. Refer to the Notes Section below on Weighting the Kraut.
-
Cover the container and allow to ferment at room temperature, out of direct sunlight, for 2-3 weeks. The covering method will depend on the type of fermentation container used. Refer Notes Section below: Fermentation Containers. The time will depend on the ambient room temperature. Check regularly to make sure the mixture remains submerged and taste until it reaches your preferred sauerkraut style – a fresh milder fermented taste or a mature full bodied fermentation profile.
-
Burp the jar daily if you are fermenting in a container that doesn’t allow the gases to escape. Refer the Notes Section below: Fermentation Containers, Jars with Sealable Lids. When you are happy with the flavour, transfer to clean dry jars and store in the fridge. This will stop the fermentation process.
Unopened it will keep for several months. Once opened eat within 2 months. Refer the Notes Section below on Storing the Kraut.
NOTES
- Thoroughly wash your hands to prevent any contamination during the massaging stage. Wash all equipment in hot soapy water and dry prior to use.
- Chlorinated water. Chlorine is often added to water supplies specifically to kill potentially harmful microorganisms. Adding heavily chlorinated water slows, inhibits, or can prevent fermentation. Chlorine can be removed by, (1) passing the water through a filter,(2) boiling the water, or(3) placing water in a large open pot for 1-2 days to allow the chlorine to evaporate
- Florence Fennel is a special variety of fennel which has been selected and grown for its swollen fleshy bulb that sits above the ground..
- If you re growing your own Florence fennel, use the fine leaves from the bulb. These are generally removed when sold in retail outlets. As a substitute, purchase the fresh
- herb or dried fennel as the last option. The fresh options will have a rich anise-flavour which adds another flavour dimension to the kraut.
- After experimenting with a number of different types of fermentation containers, I use a ceramic crock with a moat and disks to weigh down the ferment for larger batches. For my small batch experiments I use a jar with an airlock lid. Both options consistently produce excellent ferments that requires little additional effort during the fermentation stage. I’ve provided a description of the most popular container options for home preserves. Experiment and find which one works best for your lifestyle and budget.
- Florence Fennel is a special variety of fennel which has been selected and grown for its swollen fleshy bulb that sits above the ground.
- Variations
- The kraut can be flavoured with your favourite herbs or spices including, caraway, cumin, mustard seeds, horseradish, tarragon, and pepper. Fresh, dried or seeds can be used and added at the massage stage. Fresh grated apple, cabbage, carrot, and celeriac can be used to jazz up your sauerkraut batch.
- If white cabbage is used, its colour will change from green to a creamy white translucent colour. If the cabbage is mixed with a strong coloured vegetable such as beetroot, it will take on that colour.
FERMENTATION CONTAINERS
- Learning to ferment doesn’t require an expensive outlay on specialist fermenting crocks. Different shaped vessels offer different functional benefits. Wide mouth jars with or without sealable lids or with lids which have airlocks attached, or ceramic crocks with or without lids are the most popular options. Regardless of the type of vessels used, the kraut still must be weighed down and remain submerged by its natural juice and brine during the fermentation process.
- Glass Jars with sealable lids.
- Wide open mouth jars are better as it’s easier to get the kraut in/out. Sauerkraut fermentation, unlike kombucha or vinegar ferments, does not require oxygen or microbes from the air and can be fermented in a sealed container. A by-product from the fermentation, CO₂ gas, will build up and create pressure in the jar. To prevent the jar from exploding, it is important to release the pressure, by removing the lid, so the gas can escape, and then reseal it. This process is known as “burping.” The kraut must still be weighed down during the fermentation stage.
- Glass Jars covered with cloth
- After packing the jar, weigh the kraut down using the plastic bag method, as outlined in Notes Section below: Weighting the Kraut. Cover with a heavy cloth and secure tightly to the jar. The disadvantage of this method is it’s open to the air and aerobic moulds and yeasts can form on the top of the sauerkraut. This should be scraped off as soon as it’s noticed. The kraut can still be used as the moulds and bacteria are unable to grown in the anaerobic environment of the kraut. However, some people do not like to do this. If you are one of those, use the sealed jar or airlock method.
- Glass Jars fitted with an airlock.
- Jars with airlock attachments for lids are relatively inexpensive to purchase from preserving outlets and speciality homeware stores After packing and weighting the kraut mixture to 2 cm (1 inch) from the top of the jar, attach the airlock lids. Fill the airlock with water to the prescribed level and proceed to the fermentation stage. Different sizes and configurations are available to suit a variety of budgets and are easy to search on the internet. Some popular brands are Fowlers Vaccola, Kilner, Masons and Le Parfait.
- Fermenting Crock
- Ceramic and pottery crocks are ideal for larger scale production. The straight sided cylindrical shape provides a large surface which makes packing, removing, and weighting the kraut easy. Some fermenting crock kits come with ceramic weights for this purpose. Alternatively, it can be weighed down using the plastic bag or plate method and covered with a heavy cloth as described in Notes Section below: Weighting the Kraut. Note moulds and yeasts can still gain entry and create the same problem as outlined in this Section.
- Some crocks are designed with a moat around the top of the mouth. This is filled with water and a fitted top sit inside the moat. This prevents oxygen from entering, while allowing the CO₂ gas to escape.
- Metal
- Fermenting in metallic containers should be avoided. The natural acids from the fermentation and the salt can cause the metal to corrode and contaminate your batch.
- Stainless Steel
- Industrial stainless steel containers can be used but not household stainless steel grade containers. A thin stainless coating is applied to a metal base. Corrosion will occur anywhere the stainless steel has been scratch.
- Enamel pots can be used as the enamel protects the metal from corrosion. Check carefully to ensure the enamel is not cracked or pitted.
PREPARING THE KRAUT
- Use fresh cabbage and beetroot as they will have a higher water content. During the massage process more natural juices will flow creating more liquid for the fermenting stage.
- Always thoroughly wash the beetroot and cabbage and remove damaged leaves or areas to prevent any contamination. If using home grown cabbage be sure to remove any bugs and snails that may be hiding in between the folds of the cabbage leaf.
- The veggies can be cut by hand or with a mandolin, chopped or grated. However, the finer the veggies, the easier they are to massage. Chopped vegies will change the final consistency of the kraut.
SALTING THE KRAUT
- Salting is critical to making sauerkraut as it helps to breakdown the cellular wall structure and draws out the natural juice as well as inhibiting the growth of undesirable bacteria and moulds.
- When making your own batches of varying sizes, as a guide use 1.5% salt of the weight of the prepared veggies.
- Use a good quality sea salt, unrefined, where possible, when preserving. It’s worth hunting around for. Table salt, which is cheap and readily available in supermarkets contains stabilisers and anti-caking agents and often iodide which forms a whitish haze and sediments in pickled vegetable recipes. These additives and in particular iodine can affect the appearance and taste of pickles during the maturation and storage period. The ingestion of a cocktail of anti-caking chemicals such as calcium silicate, sodium silicoaluminate, tricalcium phosphate, magnesium carbonate, silicon dioxide and yellow prussiate of soda, is also unnecessary. Lite Salt may be used in quick pickle recipes; however, it may result in a slightly different taste than expected.
- The natural calcium and magnesium impurities of unrefined sea salt helps to cross link and reinforce the cell wall pectin’s, creating a crisp pickle.
- Caution: Reduced-sodium salt in fermented pickle recipes is not recommended. This salt creates a favourable environment for the growth of harmful bacteria. The correct concentration of salt is vital to obtaining the crisp texture of fermented foods and food safety.
MASSAGING THE KRAUT
- Massaging the kraut is a special moment in the kitchen for me. I put my favourite music on and slip away into a rhythm where the music and massage converge. Leave the veggies to stand with the salt for 10-15 minutes before massaging as this helps to soften them and will be easier and reduce the massage time. For the massage technique, mix the veggies and salt together using firm scrunching and massaging motions. Add any spice or herb flavourings at this point. An alternative to massaging by hand is to use a wooden mallet, pestle, or the end of a rolling pin.
- Massage until the mixture looks wilted and a fair amount of juice has accumulated in the bowl. When using beetroot or purple cabbage in the mix, the juice and final preserve will take on a pink hue.
- If no juice flows it could be (1) veggies are old and/or have a low moisture content, (2) veggies are cut up too large, (3) insufficient massaging time, (4) type of veggies chosen have a low moisture content and are more suited to a brine fermentation.
PACKING THE KRAUT
- Transfer mixture to a clean dry jar or fermenting crock, progressively packing it down firmly with either your fist or a pounder and adding some juice as you go. Fill jar to approximately 5 cm (2 inch ) from the top of the jar and make sure that mixture has a 2 cm covering of juice. A firm pack is necessary to make the juice rise over the mixture and to push out the air bubbles. If there is insufficient juice to cover the mixture with brine. Make by mixing 1 ½ tablespoons salt with 1 litre (1 ¾ pints) boiling water. Cool before adding to the cabbage mixture. The head space between the top of the mixture when weighted down and the top of the jar is necessary to allow the beetroot to expand and provides a space for the gases formed during the fermentation process.
WEIGHTING THE KRAUT
- The kraut must remain submerged during the fermentation process. Ferments which are not completely covered will develop a mould or an “off taste.” Professional fermentation crockpots come with ceramic weights or the plastic bag method.
- Plastic bag method. Place a food grade plastic bag inside another to make a double bag. Fill with a brine solution and lay over the kraut mixture. The bag should be a snug fit between the inside of the persevering crock or glass jar and seal the kraut from the air. This will prevent the growth of a yeast film or mould. Adjust the amount of brine in the bag to ensure that kraut is submerged. Twist and tie the bag to form a secure seal. The bag will act as a cushion on the kraut and keep it weighted down. It’s important that the bag is large enough to spread across and completely fill the jar and that it cannot leak. A brine solution is used so that in the event the bag breaks and spill into the kraut, the fermentation juices will not be diluted by the accidental addition of water. Use the brine solution outlined in the section above :Packing the Kraut.
- Ceramic weights method. If using a sauerkraut fermenting crock, after the kraut is packed in, weigh them down with the weights supplied with the kit. Cover with the supplied lid
FERMENTING THE KRAUT
- Fermentation will start that day after packing. Store the kraut in the kitchen or pantry, out of direct sunlight, somewhere out of the way, but where you can keep an eye on it. The ideal fermenting temperature is 18-20 C (65-68F). If the temperature is lower, the fermentation process will be slower. If it’s hotter the fermentation time will be shorter. Allow the mixture to ferment at room temperature for approximately 2-3 weeks depending upon your taste preference or until bubbles have stopped and no bubbles (gas) rise when the crock or jar is lightly tapped. Check regularly to ensure the mixture remains submerged.
- If you are fermenting in a sealed container don’t forget to “burp it” to let the gases out. Refer to Notes Section above: Fermentation Containers: Jars with Sealed Lids.
STORING THE KRAUT
- When ferment is ready, transfer to smaller sealable jars. Tightly pack the kraut, cover with the juice and seal. If there is insufficient juice, cover with a brine solution. Store in the fridge to stop the fermentation process .Unopened it will keep from several months for up to a year. Once open, it’s best to eat within 2 months.
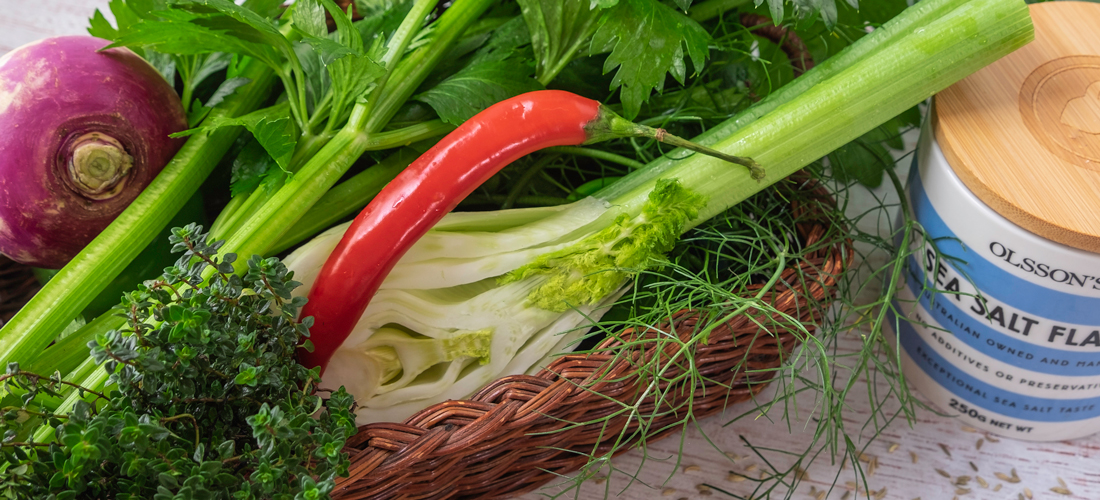
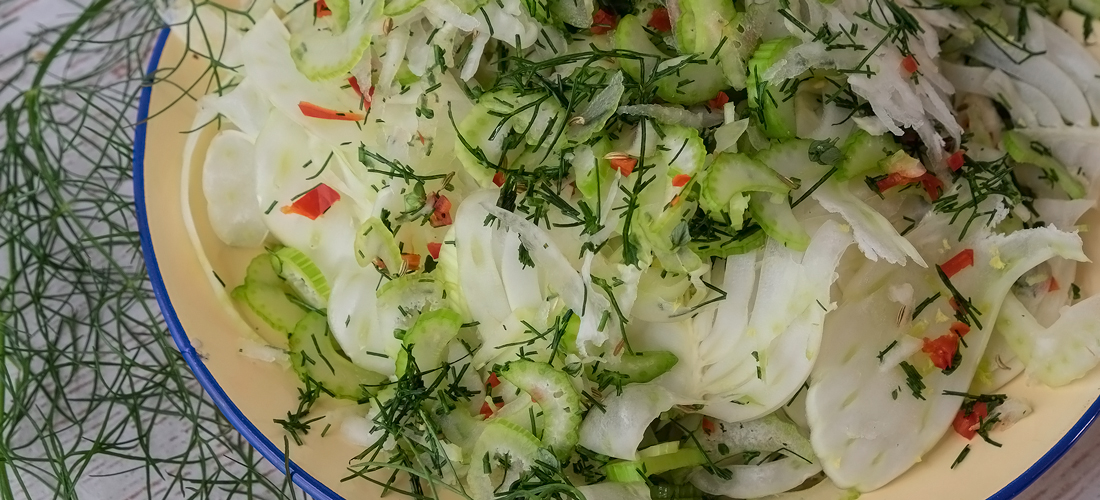 Prepared ingredients ready for their salt & massage treatment